Time Saving Tips for Course Creation
Below are some time saving tips to help you become more efficient when setting up your Moodle courses, whether multiple courses each term or creating ongoing content from year-to-year.
Configuring the Gradebook
- Set up your gradebook before starting to add activities. Doing this eliminates having to organize them all into categories later. Instead, set it up first and align your activities to the gradebook as you build each one.
- If you’ve already created a course and need to organize the gradebook, select multiple activities at once in the Categories and Items tab by using the checkboxes and then use the Move drop-down menu to select the appropriate category.
Working with Files
- Bulk upload resources (PDFs, word docs, graphics, etc.) into your Private files area using a .zip folder of files.
- Drag and drop files into the Files area rather than using the Add button.
- To access your private files to add additional content, click the Private Files button in the Navigation drawer on the left side of your course.
- Make use of Private Files and Recent files repositories to reuse content you use frequently.
Configuring Completion Tracking
- Determine if you will track completion of activities before building the course. If you will use it, then enable it within the course settings before adding items to the course.
- As you create items configure the activity completion settings.
Creating Content
- If creating a series of courses consider creating a course template outlining your course framework.
- Duplicate activities with similar settings. When building a course, we often use similar settings for an activity in order to maintain consistency in the user experience and grading strategies. This is when the Duplicate feature comes in handy. Simply create the activity/resource once, duplicate it, customize it, and move it. For example create a Quiz resource and configure all of your desired settings. Duplicate that Quiz for the given number of quizzes in your course. Then go into each quiz individually and configure the question bank. See Also Save Default Quiz Settings
- Drag and drop items onto your course front page. You can add File resources quickly by dragging and dropping files from your computer onto the front page of the course. Drag and drop a .zip folder of files to the desktop to create a Folder resource. (In lieu of drag/drop, you can also utilize the Private files or Recent Files Repositories)
- Utilize the Page or Book resource for large amounts of content. The content is easily transferable to another course and helps reduce scroll fatigue for students.
- Create advanced grading forms for assignments and reuse your own forms for new ones.
Locating your Courses
Once you have logged into Moodle, you can find your courses in one of two places:
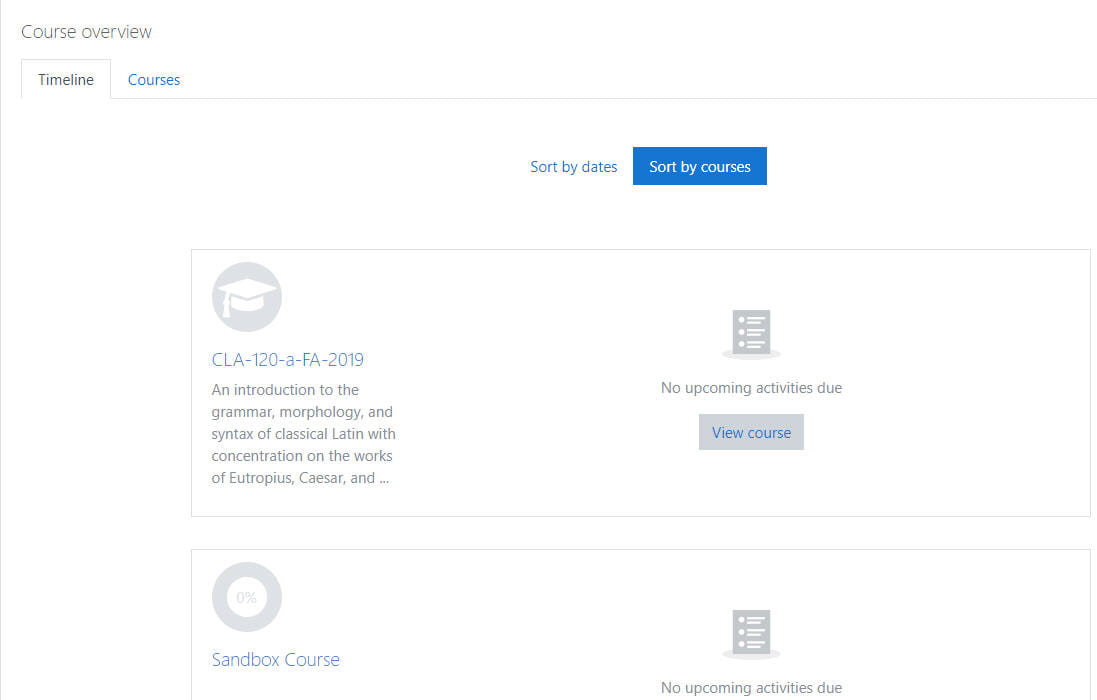
- The landing page for Moodle is your Dashboard. The block in the center is the Course Overview Block which contains your courses.
You’ll see several view options to sort by:
a. Timeline – this view allows you to see upcoming activities that are due or require attention. Within this view, you can sort by Date or by Courses.
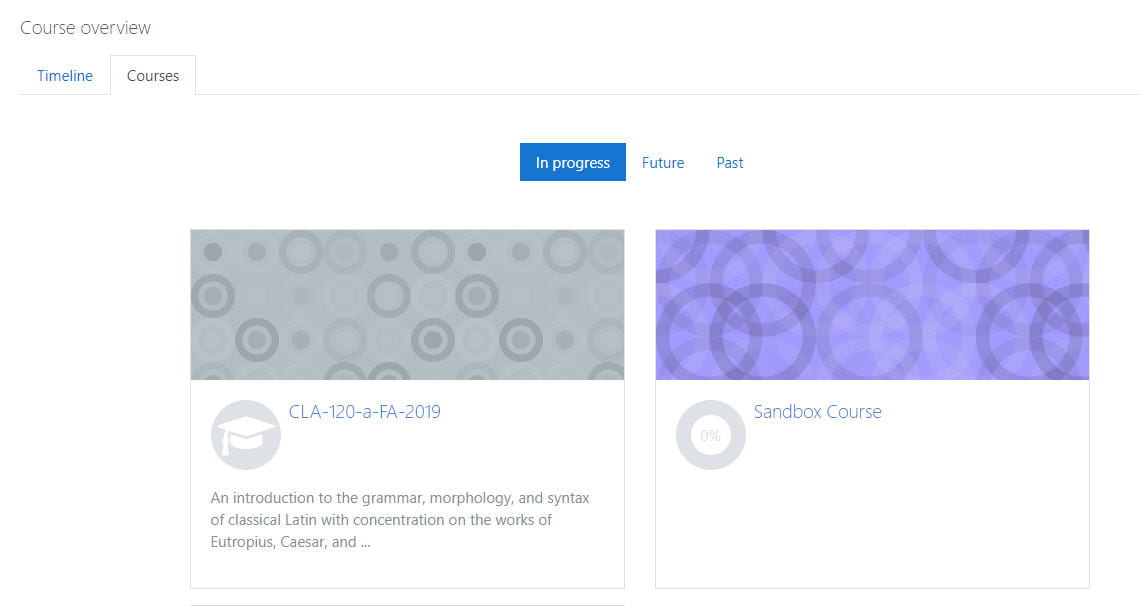
b. Courses – this view allows you to see all courses you are enrolled in, but sorts them automatically by course enrollment dates. They are sorted by In progress, Future, Past.
Courses you are currently enrolled in, that are Active, should be listed under In Progress. If they are not listed under this view, then the course start or end dates may need to be adjusted accordingly. See Adjusting Course Start Dates and End Dates.
If you want to display an image for your course in this view, instead of the pattern shown here, follow these steps:
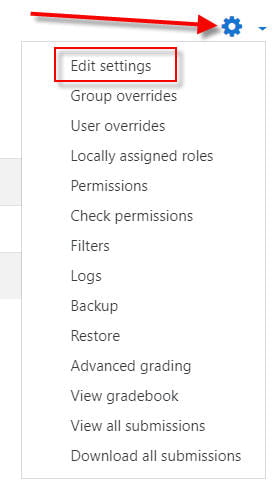
- Go to your course and Edit Settings
- Scroll down to Course summary files and drag and drop or use file picker to find image. **Image MUST be in landscape mode.
- Click Save and display.

Course now appears on Dashboard with image instead of default pattern.
You can also locate courses on the left Navigation Panel.
1. Along the left navigation drawer you will see a My Courses link with a listing of Courses for which you are enrolled. (This list is limited to reduce clutter.)

Course Layout and Design
Changing the Course Structure: Weekly, Topic, Grid, Tiles, or Collapsed Topics Format
Moodle offers you a great deal of flexibility in changing how your course content is displayed. The middle column of your course homepage is divided into sections and provides a space for you to include links to all of your course’s resources and activities. Although there are multiple ways to organize your course content, we recommend you choose the Topics format, Weekly Format, Grid, Tiles, or Collapsed Topics format. Single Activity format is only recommended for Advising and single use courses.
1. To begin, log into your course and click the Settings (wheel) icon and click Edit Settings in the upper right-hand corner of your course page.
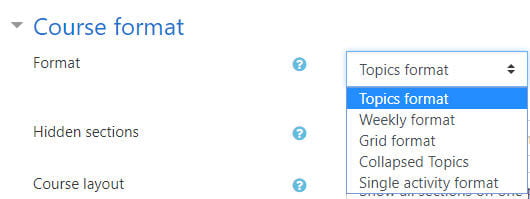
2. In the page that appears, scroll down to the Course Format section, expand to see the pull-down menu (it follows the course summary files text box). Select the format you prefer:
- Topics format will display your content into thematic sections that you can label any way you like. For example, you can label each section based on chapters, themes, or any kind of group naming scheme.
- Weekly format will display each section as weeks, beginning with the start date for your course.
- Grid format will display blocks of content that you can label anyway you like. When you click on a grid, it displays content from a particular section similar to the topics format
- Tiles format will display a series of tiles that can be customized, nested, and labeled. When you click on a tile you have the option to view content in a list view or with sub tiles.
- Collapsed topics format will display each section as a collapsible topic to help minimize the “scroll of death.”
Grid, Tiles, and Collapsed Topic formats have additional settings you may want to set – review these and make appropriate setting changes if necessary.
Topics and Weekly Formats are standard (16 weeks, Hidden sections shown in collapsed form, and all sections on one page) – the latter two options can be changed from here. Topic sections can be added or removed directly from your course page.
3. Click Save and display.
NOTE: If you imported an older course with more than 16 topic sections, some of your content may not be visible and you could have an “Orphaned Section” message. If that occurs, simply add additional sections to your course using the “Add Topics” button at the bottom of your course page when editing is on.
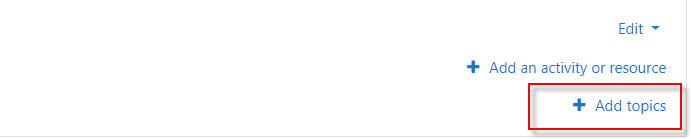
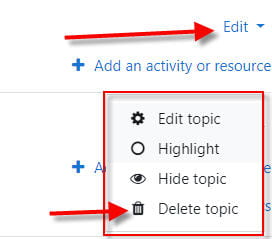
If you need fewer topics, simply click Edit on the topic you wish you delete, then select Delete topic.
Create more screen space on your course page
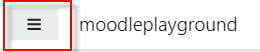
You now have the ability to create more screen space by hiding the Navigation drawer using the hamburger menu at the top left.
Your course area will increase by closing the Navigation drawer.
It will remain that way until you open it again, even if you log out of Moodle and back in.
Editing your Course Settings
Making changes to your course settings:
- To get to the course settings page, Click the Settings (wheel) Icon in the upper right-hand side of your course.

2.Select Edit Settings from the list of options.
3. Here you can change your:
- Course Name
- Course visibility
- Course Start Date/End Date (keep in mind, these correlate to the way they appear in the Course Overview for both faculty and students)
- DO NOT change or enter data into the Course ID Number field!!
4. You can change your course format, turn on/off completion tracking, and enable group mode. More about each of these settings can be found by clicking on the links. EDIT